Non-linear Framework
- Have you seen those non-linear visual novels where you select locations and time advances? Well, that's quite easy to do in vn-Canvas. I do not know what that framework is called, so I'll just call it a Time & Location Framework.
- We'll use cform, map and macros to do this. So if you're not familiar with these, suggest you look it up first.
- To be able to select your locations, you need a map. Suppose I want to have a map such as given below.
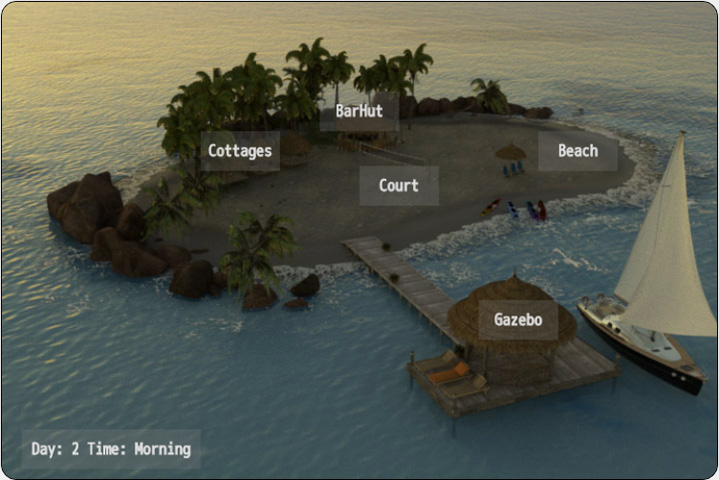
I have five locations on an island which I'll define as buttons in a cform container named "nav_map". Note the use of the reserved variable "_nav_loc" to indicate the location. (Ignore the macro calls for now.)main = [ label, "main", // initialize some variables set, {day:1, time:1, advance_time:true, navmap_date:"", navmap_image:"map1.jpg"}, label, "loop", macro, "update_map", cform, [ "nav_map", true, picture, {name:"nav_image", x:0, y:0, frames:["navmap_image"]}, button, {name:"Cottages", x:200, y:130, w:80, h:40, link:[set, {_nav_loc:"Cottages"}], tip:"Go to cottages", showText:true}, button, {name:"BarHut", x:320, y:90, w:80, h:40, link:[set, {_nav_loc:"BarHut"}], tip:"Go to bar", showText:true}, button, {name:"Beach", x:540, y:130, w:80, h:40, link:[set, {_nav_loc:"Beach"}], tip:"Go to beach", showText:true}, button, {name:"Court", x:360, y:165, w:80, h:40, link:[set, {_nav_loc:"Court"}], tip:"Go to court", showText:true}, button, {name:"Gazebo", x:480, y:300, w:80, h:40, link:[set, {_nav_loc:"Gazebo"}], tip:"Go to gazebo", showText:true}, button, {name:"navmap_date", x:20, y:430, w:180, h:40}, ], cform, "close", macro, "jump_to_scene", label, "end_scene", macro, "update_timeline", jump, "loop", ] - When a user clicks on a button, the cform is closed and we'll take the user to the selected location. This is handled by the macros "jump_to_scene" and "update_timeline".
- Update: Notice the link parameter? The one with the "set" command? A more general (and recommended) approach would be to use a
"macro" instead of "set". This makes it possible to do all sorts of actions you want to add when the user clicks on the map.
So instead of a simple "set" command as below:
button, {name:"Cottages", x:200, y:130, w:80, h:40, link:[set, {_nav_loc:"Cottages"}], tip:"Go to cottages", showText:true},Use the following link statement:button, {name:"Cottages", x:200, y:130, w:80, h:40, link:[macro, {update_location:"Cottages"}], tip:"Go to cottages", showText:true},Then add the macro to where you place all your macro definitions.function update_location(location) { Helper.setValue("_nav_loc", location); // add other actions here }
- The macro "jump_to_scene" looks at the value of "_nav_loc" and jumps to the location. You must have a file named
<location>.js. For example, if we have a location named "Cottages", we must have a file named "Cottages.js".
If the macro can not find the location, it'll return back to the map.
function jump_to_scene() { var loc = Helper.findVar("_nav_loc"); if ((loc !== undefined) && (loc !== null)) jump(loc+"#"+loc); else jump("main#loop"); } - You may put the macro at your plugins file, or anywhere convenient of course.
- Next, we'll define the location files. In this example, we'll make the "Cottages.js". Note: you'll have to create a similar
file for each of your defined locations.
Cottages = [ label, "Cottages", macro, {render_scene:"cottages"}, macro, "jump_to_time", label, "escape", text, "There is no need to go to the Cottages at this time.", set, {advance_time:false}, jump, "main#loop", label, "Cottages.1.1", // TODO: add scriptlines here text, "Day1 time1", set, {advance_time:true}, jump, "main#end_scene", label, "Cottages.1.2", // TODO: add scriptlines here text, "Day1 time2", set, {advance_time:true}, jump, "main#end_scene", ... ]; - We introduce here two more macros, which you can conveniently add to your plugins file.
- The first is "render_scene" macro which renders the cottages scene according to time of day. For this example, I have defined
four time-of-day settings: 1-morning, 2-midday, 3-evening, and 4-midnight. You may have different cottages scene images for
these (e.g daytime and nighttime scenes).
function render_scene(param) { var index = Helper.findVar("time"); // images are named depending on the time-of-day // for example, cottages1.jpg for cottage morning scene, // cottages2.jpg for cottage midday scene, etc. var img = param + index.toString() + ".jpg"; scene({src:img, effect:"dissolve"}); } - The second macro, "jump_to_time", chooses the event to jump to depending on the current time. Note how the labels are named:
<location>.<day>.<time>. For example, Cottages.1.2 is day1 at midday.
function jump_to_time() { var time = Helper.findVar("time"); var day = Helper.findVar("day"); var loc = Helper.findVar("_nav_loc"); jump(loc+"."+day+"."+time); } - Thus, when we enter the location script files, we check the day and time, renders it, then jumps to the events specifically for that day and time. After execution of those events, we return back to the main script. We can define as many events as we have days/time on our story.
- What if we do not have any event happening at a certain day or time? In that case, we do not define a "label" for that condition, and the macro jump will fail. This will then be captured by the "escape" clause which tells us that we do not have to go the said location at that time.
- See that "advance_time" flag? It simply tells us if we want to advance the clock or not. In either case, this will take us back to our main script.
- After we return from a location (thru "jump_to_scene"), we'll encounter the next macro called "update_timeline".
function update_timeline() { var advance = Helper.findVar("advance_time"); // check if we need to advance time if (!advance) return; var time = Helper.findVar("time"); var day = Helper.findVar("day"); if (time < 4) { // increment to next time time++; Helper.setValue("time", time); } else { // increment day but return time to start time = 1; Helper.setValue("time", time); Helper.setValue("day", day+1); } } - I think that's quite trivial. We increment the time-of-day if "advance_time" is true. If we reach time=4 or midnight, next increment puts us at morning of next day. Also as seen above, the day and time determine how your scene will look like.
- After this, we "loop" back to the start and encounter the last (actually the first) macro named "update_map".
function update_map() { var time = Helper.findVar("time"); var day = Helper.findVar("day"); var src = Helper.findVar("navmap_image"); if (src != null) { // maps are named map1.jpg, map2.jpg ... var idx = src.indexOf("map"); var newsrc = src.substring(0,idx+3)+time+'.jpg'; Helper.setValue("navmap_image", newsrc); } var timedesc = "" if (time == 1) timedesc = "Morning"; if (time == 2) timedesc = "Midday"; if (time == 3) timedesc = "Evening"; if (time == 4) timedesc = "Midnight"; Helper.setValue("navmap_date", "Day: "+day+" Time: "+timedesc); } - Here we update two things: the map image according to the time of day, and the date and time display. These are optional but enhances the look of your maps.
- What if we want to limit the choices of location depending on current position and/or time? Well this can be done using the "map" keyword. A sample is already given on the "map" reference (Reference >> Navigation >> map)for adjacent location limiting. I leave it up to you to modify/adapt it for time-based limiting. Hint: you can use "_nav_loc" as an indicator of time, not only location. ;)